
In this section of free PCT Exam Study Guide , we covers Phlebotomy which is mention in domain 4 and represent 16% of PCT exam content. It includes three essential tasks that every Patient Care Technician must mastered for effective skill in safely drawing blood specimens for laboratory testing:
- Equipment selection and Preparation
- Collection Techniques and Problem Solving
- Specimen Handling and Quality Control
These are the main topics of Phlebotomy with detail explanation are given below:
4-A: Equipment Selection and Preparation
Venipuncture Equipment Setup
Stock your tray with the correct size of a needle (typically 2122 gauge in adults), correct collection tubes to the ordered tests, a tourniquet, alcohol pads, gauze, tape, and labels.
An example is when you get to perform a CBC, take a lavender-top tube with EDTA, and when you get to perform a basic metabolic panel, a green-top tube with heparin.
Tube Color System and Additives
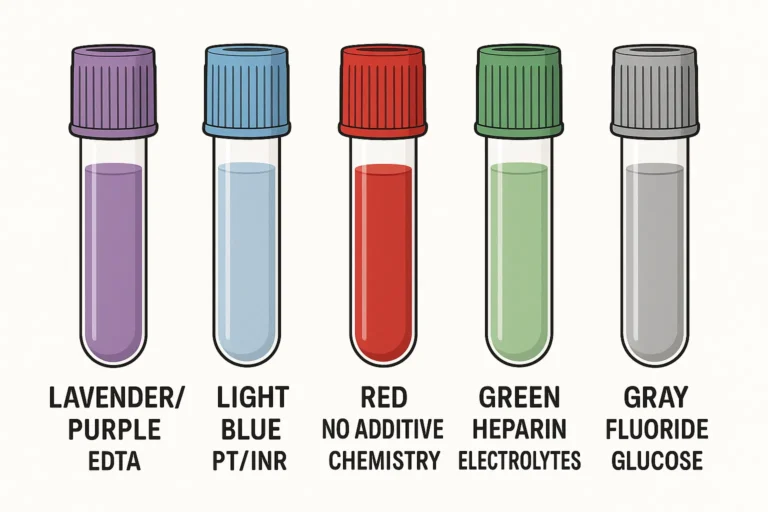
The colors at the top of the tube reveal what inside and what test it is:
- Lavender/Purple – EDTA (good for CBCs and blood typing)
- Light Blue -Sodium citrate (in use in PT/INR clotting studies).
- Red – No additives, chemistry and serology tests.
- Green – Heparin (great for electrolytes and blood gases)
- Gray – Fluoride (for glucose tests)
Always fill the tubes following the order given on the list and to the line to ensure the results will be accurate.
4.B: Collection Techniques and Problem Solving
Venipuncture Procedure Steps
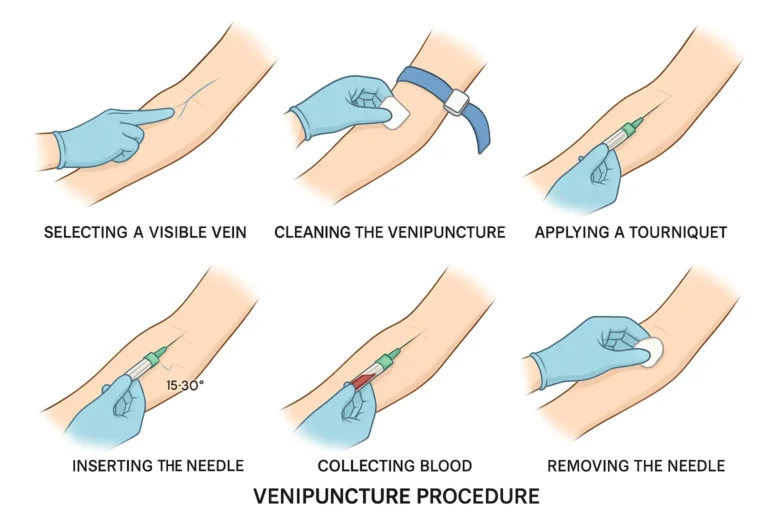
for Venipuncture Patient Care Technician, first Choose a vein, with the median cubital vein on the front of the elbow most frequently. Wipe the area clean in a small circular motion, then place the tourniquet approximately 3-4 inches above the place where you will place the needle.
At an angle of 15-30, stick the needle with the bevel facing up, allow blood to fall into the tubes, keep the tourniquet off as you remove the needle and immediately follow with firm compression.
When the median cubital vein is not obvious, then use the cephalic vein of the thumb side of the wrist.
Treatment Collection Complications
When hematoma begins (blood collecting under the skin), then immediately withdraw the needle, firmly apply pressure on the area about 5 minutes, and raise the arm whenever possible.
When you are not drawing blood, consider fishing the needle a little different or simply performing a lighter pull. Indicatively, when blood flow stops, the needle may be pinned against the wall of a vein- reverse it slightly, or swivel the tube to re-establish the flow.
Capillary Puncture Technique
When doing finger sticks, take the side of the tip (not pad), heat up hand when it is cold, dry out with alcohol pad and dry.
Select a lancet of appropriate depth, use paper towel to touch the first drop of blood and then collect the subsequent drops in the tiny microtainer tubes. In case of the heel sticks in infants, the outer edges of the heel should be used and the middle arch area should be avoided.
4.C: Specimen Handling and Quality Control
Proper Labeling and Documentation
Label the tubes immediately after the sample has been taken. Record the full name of the patient, his or her date of birth, date of collection and time of collection and also your initials.
Embark on never pre-labeling of tubes or those that were not collected on the same patient. So, when you are taking three tubes on John Smith, who was born on 1/15/1975, at 8:00 AM on 3/22/2024, be sure that all that information is visible on the tubes.
Eliminating Pre‑analytical Errors
These are errors that occur prior to the actual testing of the blood in the lab- such as a wrong tube, failure to fill the tube sufficiently, improper mixing, or taking excessive time to get it to the laboratory.
Fill the tubes to the mark, shake them carefully 5-8 times when required in the instructions and take them to the laboratory immediately. As an example, coagulation tubes must be filled to the line, and inverted to mix with citrus.
PCT Phlebotomy Situational Based Quiz
These questions are real workplace scenarios requiring immediate decision-making rather than theoretical knowledge!
Test Instructions
No. of Questions: 10
Questions: Multiple choice with 4 options (A, B, C, D)
Passing Score: 70% or higher
Review: You can flag questions for review and return to them
Submission: Click “Submit Test” when ready to finish
Next PCT Study Guide Topic
ECG(Electrocardiogram) >>